Notice
Recent Posts
Recent Comments
Link
| 일 | 월 | 화 | 수 | 목 | 금 | 토 |
|---|---|---|---|---|---|---|
| 1 | 2 | 3 | 4 | 5 | 6 | 7 |
| 8 | 9 | 10 | 11 | 12 | 13 | 14 |
| 15 | 16 | 17 | 18 | 19 | 20 | 21 |
| 22 | 23 | 24 | 25 | 26 | 27 | 28 |
Tags
- props
- node.js로 로그인하기
- Colaboratory 글자 깨짐
- 웹 게임을 만들며 배우는 리액트
- node.js 설치
- 타자 게임 만들기
- 모던자바스크립트
- Do it 자바스크립트 + 제이쿼리 입문
- JS 개념
- DB Browser
- react
- Concurrently
- You are importing createRoot from "react-dom" which is not supported. You should instead import it from "react-dom/client"
- ReactDOM.render is no longer supported in React 18. Use createRoot instead
- vs code 내 node
- Python
- 인프런
- intllij 내 Bean을 찾지 못해서 발생하는 오류
- 거북이 대포 게임
- 따라하며 배우는 노드 리액트 기본 강의
- spring-boot
- 계산맞추기 게임
- 모두의 파이썬
- 자바스크립트
- react오류
- 리액트
- Spring-Framework
- googleColaboratory
- 노드에 리액트 추가하기
- intellij
Archives
- Today
- Total
프로그래밍 삽질 중
[인프런 강의]리액트 무비앱 시리즈5 - MovieDetail(2) 본문
* 인프런 '따라하며 배우는 노드, 리액트 시리즈 - 영화 사이트 만들기' 내용 정리
* The Moive DB API 이용 (사이트 : https://www.themoviedb.org/)
* The Moive DB API 관련 설명 - 영어(사이트 : https://developers.themoviedb.org/3/getting-started/images)
* 회원가입/로그인/인증한 페이지에 이 부분 넣을 예정
[API 이용해서 MovieDetail에 정보 넣기]
1. MovieDetail에서 배우 정보 불러오기
2. commons/GridsCards(LandingPage에서 사용) 불러와서 MovieDetail.js 형식 적용하기
3. MovieDetaild에서 버튼을 이용해서 배우 프로필들 보임/안보임 적용하기
4. 구글 크롬에서 확인하기
1. MovieDetail에서 배우 정보 불러오기
import React, { useEffect, useState } from "react";
import { useParams } from "react-router-dom";
import { API_URL, API_KEY, IMAGE_BASE_URL } from "../../../Config";
import MainImage from "../LadingPage/Sections/MainImage";
import MovieInfo from "./Section/MovieInfo";
import { Row } from "antd";
import GridCards from "../commons/GridCards";

function MovieDetail() {
  //useParams만 하면 object만 나옴
  const movieId = useParams().movieId;
  const [Movie, setMovie] = useState([]);
  //배우정보 불러오기1
  const [Casts, setCasts] = useState([]);
  const [ActorToggle, setActorToggle] = useState(false);

  useEffect(() => {
    let endpointInfo = `${API_URL}movie/${movieId}?api_key=${API_KEY}`;
    //배우정보 불러오기2
    let endpointCrew = `${API_URL}movie/${movieId}/credits?api_key=${API_KEY}`;

    fetch(endpointInfo)
      .then((response) => response.json())
      .then((response) => {
        // console.log(response);
        setMovie(response);
      });

//배우정보 불러오기3
    fetch(endpointCrew)
      .then((response) => response.json())
      .then((response) => {
        // console.log(response);
        setCasts(response.cast);
      });
  });


  return (
    <div>
      {/* header */}
      <MainImage
        image={`${IMAGE_BASE_URL}w1280${Movie.backdrop_path}`}
        title={Movie.original_title}
        text={Movie.overview}
      />
      {/* body */}
      <div style={{ width: "85%", margin: "1rem auto" }}>
        {/* Movie Info */}
        <MovieInfo movie={Movie} />
        <br />
        {/* Actors Grid */}
        <div
          style={{ display: "flex", justifyContent: "center", margin: "2rem" }}
        >
          <button onClick={toggleActorView}>Toggle Actor View</button>
        </div>


      </div>
    </div>
  );
}

export default MovieDetail;
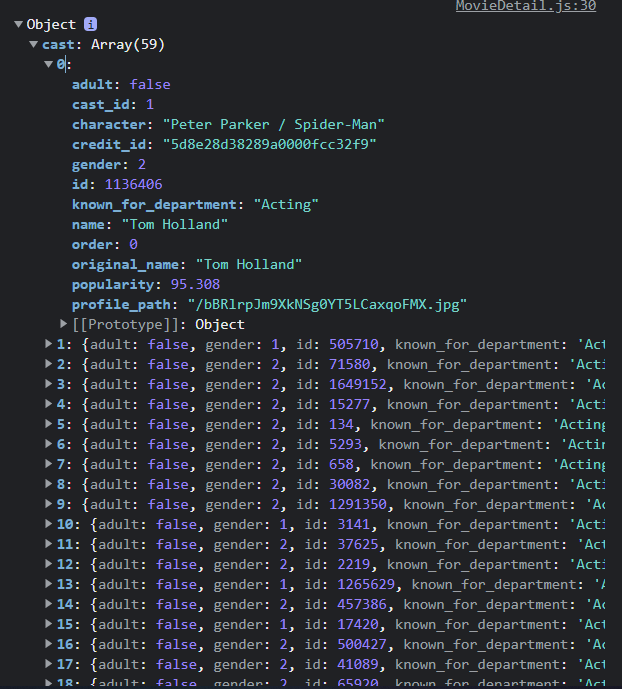
* endpointCrew를 통해 보여준 console.log(response) 정보

2. commons/GridsCards(LandingPage에서 사용) 불러와서 MovieDetail.js 형식 적용하기
import React from "react";
import { Col } from "antd";

function GridCards(props) {
  if (props.landingPage) { //if문 적용 LandingPage에는 이 부분
    return (
      // lg 시, 4열 배치(6*4), md 시, 3열 배치(8*3), xs 시 1열 배치(24*1)
      <Col lg={6} md={8} xs={24}>
        <div style={{ position: "relative" }}>
          <a href={`/movie/${props.movieId}`}>
            <img
              style={{ width: "100%", height: "320px" }}
              src={props.image}
              alt={props.movieName}
            />
          </a>
        </div>
      </Col>
    );
  } else {
    return ( //DetailPage에는 이 부분 적용
      // lg 시, 4열 배치(6*4), md 시, 3열 배치(8*3), xs 시 1열 배치(24*1)
      <Col lg={6} md={8} xs={24}>
        <div style={{ position: "relative" }}>
          <img
            style={{ width: "100%", height: "320px" }}
            src={props.image}
            alt={props.characterName}
          />
        </div>
      </Col>
    );
  }
}

export default GridCards;
* LandingPage.js 내 GridsCards 부분에 landingPage 추가
//수정 전
<GridCards
                  image={
                    movie.poster_path
                      ? `${IMAGE_BASE_URL}w500${movie.poster_path}`
                      : null
                  }
                  movieId={movie.id}
                  movieName={movie.original_title}
                />


//수정 후
<GridCards
                  landingPage //추가
                  image={
                    movie.poster_path
                      ? `${IMAGE_BASE_URL}w500${movie.poster_path}`
                      : null
                  }
                  movieId={movie.id}
                  movieName={movie.original_title}
                />
3. MovieDetaild에서 버튼을 이용해서 배우 프로필들 보임/안보임 적용하기
import React, { useEffect, useState } from "react";
import { useParams } from "react-router-dom";
import { API_URL, API_KEY, IMAGE_BASE_URL } from "../../../Config";
import MainImage from "../LadingPage/Sections/MainImage";
import MovieInfo from "./Section/MovieInfo";
import { Row } from "antd";
import GridCards from "../commons/GridCards";

function MovieDetail() {
  //useParams만 하면 object만 나옴
  const movieId = useParams().movieId;
  const [Movie, setMovie] = useState([]);
  const [Casts, setCasts] = useState([]);
  //버튼 안 보이게 초기 설정
  const [ActorToggle, setActorToggle] = useState(false);

  useEffect(() => {
    let endpointInfo = `${API_URL}movie/${movieId}?api_key=${API_KEY}`;
    let endpointCrew = `${API_URL}movie/${movieId}/credits?api_key=${API_KEY}`;

    fetch(endpointInfo)
      .then((response) => response.json())
      .then((response) => {
        // console.log(response);
        setMovie(response); //이 부분 넣어야 Movie 사용 가능
      });

    fetch(endpointCrew)
      .then((response) => response.json())
      .then((response) => {
        // console.log(response);
        setCasts(response.cast); //이 부분 넣어야 Casts 사용 가능
      });
  });

//버튼 누르면 !ActorToggle = true가 되어 정보가 보임
  const toggleActorView = () => {
    setActorToggle(!ActorToggle);
  };

  return (
    <div>
      {/* header */}
      <MainImage
        image={`${IMAGE_BASE_URL}w1280${Movie.backdrop_path}`}
        title={Movie.original_title}
        text={Movie.overview}
      />
      {/* body */}
      <div style={{ width: "85%", margin: "1rem auto" }}>
        {/* Movie Info */}
        <MovieInfo movie={Movie} />
        <br />
        {/* Actors Grid */}
        <div
          style={{ display: "flex", justifyContent: "center", margin: "2rem" }}
        >
          <button onClick={toggleActorView}>Toggle Actor View</button>
        </div>
        {ActorToggle && (
          <Row gutter={[16, 16]}>
            {Casts && //LandingPage에서는 Movie인 부분들을 Casts로 수정
              Casts.map((cast, index) => (
                <React.Fragment key={index}>
                  <GridCards
                    landingPage
                    image={
                      cast.profile_path
                        ? `${IMAGE_BASE_URL}w500${cast.profile_path}`
                        : null
                    }
                    characterName={cast.name}
                  />
                </React.Fragment>
              ))}
          </Row>
        )}
      </div>
    </div>
  );
}

export default MovieDetail;
4. 구글 크롬에서 확인하기
'과거 프로그래밍 자료들 > React' 카테고리의 다른 글
| React로 이미지 올리기 (0) | 2022.05.19 |
|---|---|
| React로 option 값 넣고 변경하기 (0) | 2022.05.18 |
| [인프런 강의]리액트 무비앱 시리즈4 - MovieDetail(1) (0) | 2022.05.17 |
| [인프런 강의]리액트 무비앱 시리즈3 - LandingPage(3) (0) | 2022.05.17 |
| [인프런 강의]리액트 무비앱 시리즈2 - LandingPage(2) (0) | 2022.05.17 |


