| 일 | 월 | 화 | 수 | 목 | 금 | 토 |
|---|---|---|---|---|---|---|
| 1 | 2 | 3 | 4 | 5 | 6 | 7 |
| 8 | 9 | 10 | 11 | 12 | 13 | 14 |
| 15 | 16 | 17 | 18 | 19 | 20 | 21 |
| 22 | 23 | 24 | 25 | 26 | 27 | 28 |
- 리액트
- intllij 내 Bean을 찾지 못해서 발생하는 오류
- react
- 노드에 리액트 추가하기
- 인프런
- googleColaboratory
- 웹 게임을 만들며 배우는 리액트
- 모두의 파이썬
- Python
- You are importing createRoot from "react-dom" which is not supported. You should instead import it from "react-dom/client"
- props
- Do it 자바스크립트 + 제이쿼리 입문
- JS 개념
- Spring-Framework
- 계산맞추기 게임
- 타자 게임 만들기
- DB Browser
- node.js로 로그인하기
- vs code 내 node
- ReactDOM.render is no longer supported in React 18. Use createRoot instead
- 따라하며 배우는 노드 리액트 기본 강의
- 모던자바스크립트
- spring-boot
- intellij
- 거북이 대포 게임
- Concurrently
- Colaboratory 글자 깨짐
- 자바스크립트
- react오류
- node.js 설치
- Today
- Total
프로그래밍 삽질 중
[인프런 강의]리액트 무비앱 시리즈1 - LandingPage(1) 본문
* 인프런 '따라하며 배우는 노드, 리액트 시리즈 - 영화 사이트 만들기' 내용 정리
* The Moive DB API 이용 (사이트 : https://www.themoviedb.org/)
* The Moive DB API 관련 설명 - 영어(사이트 : https://developers.themoviedb.org/3/getting-started/images)
* 회원가입/로그인/인증한 페이지에 이 부분 넣을 예정
[API 이용해서 LandingPage에 정보 넣기]
1. Movie DB에서 API 발급 받고 Config에 저장
2. LandingPage/LandingPage.js에 useEffect, fetch로 연결
3. Sections/MainImage에 메인 이미지 항목 만들기
4. API를 통해 LandingPage에 이미지 불러오록 수정하기
1. Movie DB에서 API 발급 받고 Config에 저장
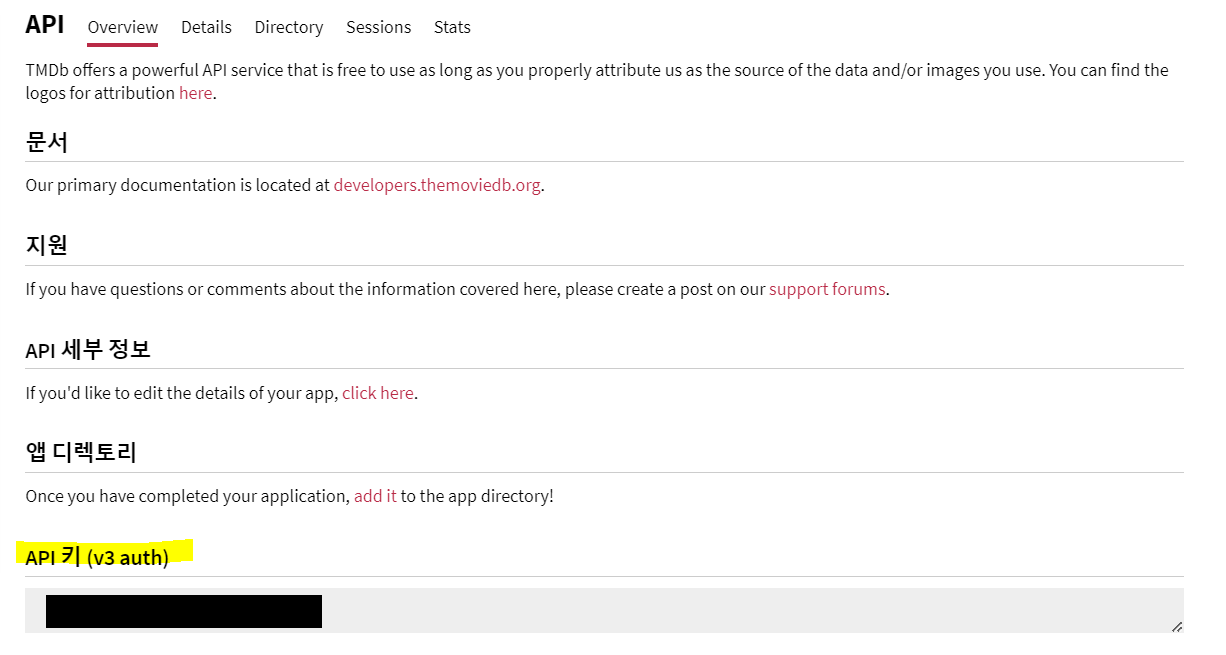
- 로그인 후 상단에 '프로필과 설정' → API에서 동의한 후 API 받기
- API 발급 키 정보가 중요(검은색 부분)

- Config에 저장
export const USER_SERVER = "/api/users";

export const API_URL = "https://api.themoviedb.org/3/";
export const IMAGE_BASE_URL = "https://image.tmdb.org/t/p/";
export const API_KEY = "각자의 API";
* API_URL
* 출처 (https://developers.themoviedb.org/3/getting-started/authentication)

* IMAGE_BASE_URL
* 출처 : (https://developers.themoviedb.org/3/getting-started/images)

2. LandingPage/LandingPage.js에 useEffect, fetch로 연결
import React, { useEffect, useState } from "react";
import { API_URL, API_KEY, IMAGE_BASE_URL } from "../../../Config";
import MainImage from "./Sections/MainImage";

function LandingPage() {
  // const navigate = useNavigate();

  //많은 정보들 => Array([])에 넣기
  const [Movies, setMovies] = useState([]);
  const [MainMovieImage, setMainMovieImage] = useState(null);
  useEffect(() => {
    const endpoint = `${API_URL}movie/popular?api_key=${API_KEY}&language=en-US&page=1`;

    fetch(endpoint)
      .then((response) => response.json())
      .then((response) => {
        console.log(response);
      });
  }, []);


  return (
    <div style={{ width: "100%", margin: "0" }}>
      {/* Main Image movie이름 : backdrop_path*/}

      <div style={{ width: "85%", margin: "1rem auto" }}>
        <h2>Movie by latest</h2>
        <hr />

        {/* Movie Grid Cards */}
      </div>

      <div style={{ display: "flex", justifyContent: "center" }}>
        <button>Load More</button>
      </div>
    </div>
  );
}

export default LandingPage;
* const endpoint 주소
* 출처 (https://developers.themoviedb.org/3/getting-started/languages)

* useEffect (출처 : https://ko.reactjs.org/docs/hooks-effect.html)
- React에게 컴포넌트가 렌더링 후 어떤일을 수행해야 하는지 말함, 넘긴 함수를 기억했다가(함수 = effect),
DOM 업데이트를 수행한 후 불러낼 것
useEffect를 컴포넌트 안에 불러내는 이유
- 컴포넌트 내부에 둠으로서 effect를 통해 LandingPage/LandingPage.js의
Movies, MainMovieImage 변수(또는 어떤 prop에도) 겁근 가능함, 함수 범위 안에 존재하기 때문에 특별한 API없이도 값을 얻을 수 있음
* fetch (출처 : https://developer.mozilla.org/ko/docs/Web/API/Fetch_API/Using_Fetch)
- HTTP 파이프라인을 구성하는 요청과 응답 등의 요소를 Javscript에서 조작할 수 있는 인터페이스 제공
- 가장 단순한 형태의 fetct()는 가져오고자 하는 리소스 경로를 나타내는 하나의 인수만 받음(JSON 파일로 가져옴)
//예시
fetch('http://example.com/movies.json')
  .then((response) => response.json())
  .then((data) => console.log(data));
3. Sections/MainImage에 메인 이미지 항목 만들기
import React from "react";

function MainImage(//props 사용 시 여기에 props 명시할 것) {
  return (
    <div
      style={{
        background: `linear-gradient(to bottom, rgba(0,0,0,0) 39%, rgba(0,0,0,0) 41%, rgba(0,0,0,0.65) 100%),
        url('${//이미지 넣을 곳}'), #1c1c1c`,
        height: "500px",
        backgroundSize: "100%, cover",
        backgroundPosition: "center, center",
        width: "100%",
        position: "relative",
      }}
    >
      <div>
        <div
          style={{
            position: "absolute",
            maxWidth: "500px",
            bottom: "2rem",
            marginLeft: "2rem",
          }}
        >
          <h2 style={{ color: "white" }}> {//제목 넣을 곳} title</h2>
          <p style={{ color: "white", fontSize: "1rem" }}>{//상세정보 넣을 곳}describe</p>
        </div>
      </div>
    </div>
  );
}

export default MainImage;
4. API를 통해 LandingPage, Sections/MainImage에 이미지 불러오록 수정하기
LandingPage/LandingPage.js 수정 전
import React, { useEffect, useState } from "react";
import { API_URL, API_KEY, IMAGE_BASE_URL } from "../../../Config";
import MainImage from "./Sections/MainImage";

function LandingPage() {
  // const navigate = useNavigate();

  //많은 정보들 => Array([])에 넣기
  const [Movies, setMovies] = useState([]);
  const [MainMovieImage, setMainMovieImage] = useState(null);
  useEffect(() => {
    const endpoint = `${API_URL}movie/popular?api_key=${API_KEY}&language=en-US&page=1`;

    fetch(endpoint)
      .then((response) => response.json())
      .then((response) => {
        console.log(response); //콘솔에 나온 정보들
      });
  }, []);
LandingPage/LandingPage.js 수정 후
import React, { useEffect, useState } from "react";
import { API_URL, API_KEY, IMAGE_BASE_URL } from "../../../Config";
import MainImage from "./Sections/MainImage";

function LandingPage() {
  // const navigate = useNavigate();

  //많은 정보들 => Array([])에 넣기
  const [Movies, setMovies] = useState([]);
  const [MainMovieImage, setMainMovieImage] = useState(null);
  useEffect(() => {
    const endpoint = `${API_URL}movie/popular?api_key=${API_KEY}&language=en-US&page=1`;

    fetch(endpoint)
      .then((response) => response.json())
      .then((response) => {
        console.log(response);
        setMovies([response.results]); //Movies에 들어감
        setMainMovieImage(response.results[0]); //results의 첫 정보
      });
  }, []);

  return (
    <div style={{ width: "100%", margin: "0" }}>
      {/* Main Image movie}

      {MainMovieImage && ( //MainMovie 정보들을 이미 가져옴
        <MainImage
          image={`${IMAGE_BASE_URL}w1280${MainMovieImage.backdrop_path}`} //이미지
          title={MainMovieImage.original_title} //제목
          text={MainMovieImage.overview} //상세정보
        />
      )}
      <div style={{ width: "85%", margin: "1rem auto" }}>
        <h2>Movie by latest</h2>
        <hr />

        {/* Movie Grid Cards */}
      </div>

      <div style={{ display: "flex", justifyContent: "center" }}>
        <button>Load More</button>
      </div>
    </div>
  );
}

export default LandingPage;
Sections/MainImage 수정 후
import React from "react";

function MainImage(props) {
  return (
    <div
      style={{
        background: `linear-gradient(to bottom, rgba(0,0,0,0) 39%, rgba(0,0,0,0) 41%, rgba(0,0,0,0.65) 100%),
        url('${props.image}'), #1c1c1c`,
        height: "500px",
        backgroundSize: "100%, cover",
        backgroundPosition: "center, center",
        width: "100%",
        position: "relative",
      }}
    >
      <div>
        <div
          style={{
            position: "absolute",
            maxWidth: "500px",
            bottom: "2rem",
            marginLeft: "2rem",
          }}
        >
          <h2 style={{ color: "white" }}> {props.title} </h2>
          <p style={{ color: "white", fontSize: "1rem" }}>{props.text}</p>
        </div>
      </div>
    </div>
  );
}

export default MainImage;
최종 화면

* 출처 : (https://ko.reactjs.org/docs/components-and-props.html)
* props : 속성을 나타내는 데이터
- react가 사용자 정의 컴포넌트로 작성 후 엘리먼트 발견하면 JSX 어ㅌ리뷰트와 자식을 해당컴포넌트에 단일 객체(props)로 전달
예시
//Comment

function Comment(props) {
  return (
    <div className="Comment">
      <UserInfo user={props.author} /> //UserInfo
      <div className="Comment-text">
        {props.text}
      </div>
      <div className="Comment-date">
        {formatDate(props.date)}
      </div>
    </div>
  );
}

//UserInfo
function UserInfo(props) {
  return (
    <div className="UserInfo">
      <Avatar user={props.user} />
      <div className="UserInfo-name">
        {props.user.name}
      </div>
    </div>
  );
}

//Avatar
function UserInfo(props) {
  return (
    <div className="UserInfo">
      <Avatar user={props.user} />
      <div className="UserInfo-name">
        {props.user.name}
      </div>
    </div>
  );
}
* useState([]), useState(null)
- 자료형의 경우 [], 위의 Movies를 console.log(response)로 확인할 때 여러 정보가 많으므로 []로 사용
- null의 경우 잘 모르겠음...
'과거 프로그래밍 자료들 > React' 카테고리의 다른 글
| [인프런 강의]리액트 무비앱 시리즈3 - LandingPage(3) (0) | 2022.05.17 |
|---|---|
| [인프런 강의]리액트 무비앱 시리즈2 - LandingPage(2) (0) | 2022.05.17 |
| client(react)와 server(node.js) 연결하기 - proxy 연결 오류 (0) | 2022.05.16 |
| client(react)와 server(node.js) 연결하기 - 인증하기 중 오류 발생 (0) | 2022.05.12 |
| client(react)와 server(node.js) 연결하기 - 로그인 하기(클라이언트 부분) (0) | 2022.05.11 |


