| 일 | 월 | 화 | 수 | 목 | 금 | 토 |
|---|---|---|---|---|---|---|
| 1 | 2 | 3 | 4 | 5 | ||
| 6 | 7 | 8 | 9 | 10 | 11 | 12 |
| 13 | 14 | 15 | 16 | 17 | 18 | 19 |
| 20 | 21 | 22 | 23 | 24 | 25 | 26 |
| 27 | 28 | 29 | 30 | 31 |
- 노드에 리액트 추가하기
- JS 개념
- 웹 게임을 만들며 배우는 리액트
- Spring-Framework
- 모던자바스크립트
- 모두의 파이썬
- DB Browser
- node.js 설치
- Concurrently
- react오류
- 거북이 대포 게임
- vs code 내 node
- node.js로 로그인하기
- googleColaboratory
- Do it 자바스크립트 + 제이쿼리 입문
- intellij
- Python
- 자바스크립트
- intllij 내 Bean을 찾지 못해서 발생하는 오류
- spring-boot
- 타자 게임 만들기
- react
- 리액트
- You are importing createRoot from "react-dom" which is not supported. You should instead import it from "react-dom/client"
- 계산맞추기 게임
- props
- 인프런
- 따라하며 배우는 노드 리액트 기본 강의
- ReactDOM.render is no longer supported in React 18. Use createRoot instead
- Colaboratory 글자 깨짐
- Today
- Total
프로그래밍 삽질 중
프로젝트 수정 2 - node.js로만 구성된 프로젝트에 리액트 추가(서버 항목 : 로그인/인증) 본문
* 현재 진행상황
- 프로젝트에 CRUD만 만든 상황
- fetch로 로그인 했으나 auth로 로그인 및 react로 로그인 화면을 만드는 것이 중요하다고 판단
- node.js 화면단을 ejs로 만들었으나 react에서 js로 만들 예정
- 참고 강의 : 따라하면서 배우는 노드, 리액트(로그인 부분)
[로그인 만들기 - server 부분]
1. index.js에 router 만들기
2. auth.ctrl.js에서 기능만들기
- mongoDB에 저장한 users와 이메일이 맞는지
- 이메일이 맞다면 비밀번호가 같은지
- 비밀번호가 갖다면 토큰을 생성할 것
3. auth.ctrl에 들어간 기능들을 models/User.js에서 생성하기
- comparePassword : 저장된 비밀번호와 입력한 비밀번호가 일치하는지
- generateToken : 비밀번호가 맞을 경우 토큰 생성하기
4. postman에서 확인하기
* cookie 사용
- app.js 혹은 index.js(서버 가동하는 js 파일에) cookie-parser 설치할 것
- app.use(cookieParser()); 추가할 것
1. index.js에 router 만들기 - [routes/auth/index.js]
const express = require("express");
const router = express.Router();
const authCtrl = require("./auth.ctrl");

router.post("/api/user/register", authCtrl.process.register);
router.post("/api/user/login", authCtrl.process.login);

module.exports = router;
2. auth.ctrl.js에서 기능만들기 - [routes/auth/auth.ctrl.js]
① mongoDB에 저장한 users와 이메일이 맞는지
② 이메일이 맞다면 비밀번호가 같은지
③ 비밀번호가 갖다면 토큰을 생성할 것 //res.cookie("x_auth")는 인증부분에서도 사용됨
"use strict";
const { User } = require("../../models/home/user");

const process = {
  register: (req, res) => {//회원가입 부분}

  login: (req, res) => {
    //① mongoDB에 저장한 users와 이메일이 맞는지
    User.findOne({ email: req.body.email }, (err, user) => {
      if (!user) {
        return res.json({
          loginSuccess: false,
          message: "제공된 이메일에 해당하는 유저가 없습니다.",
        });
      }
      //② 이메일이 맞다면 비밀번호가 같은지
      //comparePassword와 isMatch는 user.js에서 만들어짐
      user.comparePassword(req.body.password, (err, isMatch) => {
        if (!isMatch) {
          //false
          return res.json({
            loginSuccess: false,
            message: "비밀번호가 틀렸습니다.",
          });
        }
        //③ 비밀번호가 갖다면 토큰을 생성할 것
        //generateToken 또한 user.js에서 만들어짐
        user.generateToken((err, user) => {
          if (err) return res.status(400).send(err);

          //토큰을 저장한다 어디에? 1. 쿠키, 2. 로컬스토리지
          res
            .cookie("x_auth", user.token)
            .status(200)
            .json({ loginSuccess: true, userId: user._id });
        });
      });
    });
  },
};

module.exports = {
  process,
};
3. auth.ctrl에 들어간 기능들을 생성하기 - [models/user.js]
① 비밀번호가 일치하는지 : comparePassword와 isMatch
const mongoose = require("mongoose");
const bcrypt = require("bcrypt"); //암호화 하기 위함
const saltRounds = 10;
const jwt = require("jsonwebtoken"); //토큰 생성하기 위함

const userSchema = new mongoose.Schema({ // 스키마 });

userSchema.pre("save", function (next) { // 회원가입 });

userSchema.methods.comparePassword = function (plainPassword, cb) {
  //this가 가리키는 대상, userSchema / this 사용 시 function 사용할 것
  var user = this;
  //plainPassword : 암호화 전 비밀번호 cb : 암호화된 비밀번호
  bcrypt.compare(plainPassword, user.password, function (err, isMatch) {
    if (err) return cb(err);
    cb(null, isMatch);
  });
};

const User = mongoose.model("User", userSchema);

module.exports = { User };
* schema 다음 .methods 붙이는 이유
* 출처 : (https://mongoosejs.com/docs/guide.html)

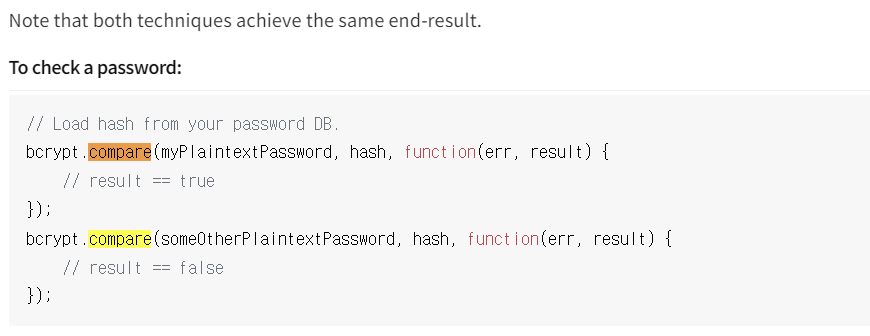
* bcrypt에서 비밀번호 비교하는 방법 - 1
* 출처 : (https://www.npmjs.com/package/bcrypt)

* bcrypt에서 비밀번호 비교하는 방법 - 2
- isMatch는 예시의 result라고 생각하기

② 토큰을 생성하기 : generateToken
- 토큰의 이름은 'secretToken'으로 정의 -> 인증 부분에 필요한 것
const mongoose = require("mongoose");
const bcrypt = require("bcrypt"); //암호화 하기 위함
const saltRounds = 10;
const jwt = require("jsonwebtoken"); //토큰 생성하기 위함

const userSchema = new mongoose.Schema({ // 스키마 });

userSchema.pre("save", function (next) { // 회원가입 });

userSchema.methods.comparePassword = function (plainPassword, cb) {
  //비밀번호 비교하기
};

userSchema.methods.generateToken = function (cb) {
  //user값 가져오기
  var user = this;

  //jsonwebtoken을 이용해 token 생성
  var token = jwt.sign(user._id.toHexString(), "secretToken");

  user.token = token;
  user.save(function (err, user) {
    if (err) return cb(err);
    cb(null, user);
  });
};

const User = mongoose.model("User", userSchema);

module.exports = { User };
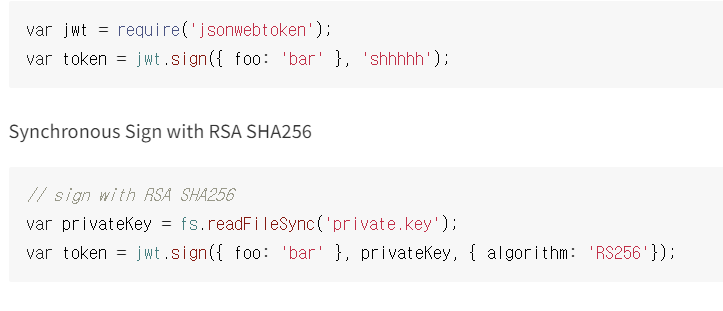
* token을 사용하는 방법
- 출처 : (https://www.npmjs.com/package/jsonwebtoken)

* user._id.toHexString() 사용 이유
- 예시의 {foo: 'bar'}의 타입은 object , 하지만 user._id는 String값이 아니므로 toHexString() 메서드를 이용
- 출처 : (https://velog.io/@bigbrothershin/Backend-MongoDB-%EB%A9%94%EC%84%9C%EB%93%9C-ObjectID.toHexString)
[models/user.js] 전체 코드
const mongoose = require("mongoose");
const bcrypt = require("bcrypt");
const saltRounds = 10;
const jwt = require("jsonwebtoken");

const userSchema = new mongoose.Schema({
  name: {
    type: String,
    maxlength: 50,
  },
  email: {
    type: String,
    trim: true,
    unique: 1,
  },
  password: {
    type: String,
    minlength: 5,
  },
  lastname: {
    type: String,
    maxlength: 50,
  },
  role: {
    type: Number,
    default: 0,
  },
  image: String,
  token: {
    type: String,
  },
  tokenExp: {
    type: Number,
  },
});

//user.save 전에 작동
userSchema.pre("save", function (next) {
  //위의 user 가져오기
  var user = this;
  //비밀번호 바꿀 때 조건
  if (user.isModified("password")) {
    //비밀번호 암호화
    bcrypt.genSalt(saltRounds, function (err, salt) {
      if (err) return next(err);
      bcrypt.hash(user.password, salt, function (err, hash) {
        if (err) return next(err);
        user.password = hash;
        next();
      });
    });
  } else {
    //비밀번호가 바뀌지 않을 때 next()가 바로 시작됨
    next();
  }
});

userSchema.methods.comparePassword = function (plainPassword, cb) {
  //위의 user 가져오기
  var user = this;
  //plainPassword : 암호화 전 비밀번호 cb : 암호화된 비밀번호
  bcrypt.compare(plainPassword, user.password, function (err, isMatch) {
    if (err) return cb(err);
    cb(null, isMatch);
  });
};

userSchema.methods.generateToken = function (cb) {
  var user = this;

  //jsonwebtoken을 이용해 token 생성
  var token = jwt.sign(user._id.toHexString(), "secretToken");

  user.token = token;
  user.save(function (err, user) {
    if (err) return cb(err);
    cb(null, user);
  });
};

const User = mongoose.model("User", userSchema);

module.exports = { User };
4. postman에서 확인하기


'과거 프로그래밍 자료들 > 프로젝트' 카테고리의 다른 글
| 프로젝트 수정 6 - node.js로만 구성된 프로젝트에 리액트 추가(클라이언트 항목 : 회원가입하기) (0) | 2022.05.16 |
|---|---|
| 프로젝트 수정 5 - node.js로만 구성된 프로젝트에 리액트 추가(클라이언트 항목 : 구성 및 로그인하기) (0) | 2022.05.16 |
| 프로젝트 수정 4 - node.js로만 구성된 프로젝트에 리액트 추가(서버 항목 : 로그아웃) (0) | 2022.05.14 |
| 프로젝트 수정 3 - node.js로만 구성된 프로젝트에 리액트 추가(서버 항목 : 로그인/인증2) (0) | 2022.05.13 |
| 프로젝트 수정 1 - node.js로만 구성된 프로젝트에 리액트 추가(서버 항목 : 회원가입) (0) | 2022.05.13 |


